December 3, 2022
Do you know the ideal dimensions for a woodworking workbench? Well, if you don’t know, you’re not alone, for almost all beginners in woodworking ask this question more often. However, if you are only recently jumpstarting your woodworking career, it will be best to begin by building your workbench according to the ideal dimensions suggested by expert woodworkers. But what are the optimum dimensions of a woodworking workbench?
The ideal dimensions, however, depend on who is using the workbench. If you are a six-foot-five guy, for example, you wouldn’t want a workbench that is too low. Similarly, if you’re as tall as Napoleon Bonaparte, you don’t want a workbench that is too tall. Nevertheless, what is essential is when you build your workbench, you should pay attention to details.
Essential Workbench Features You Have to Know Before Deciding the Optimal Dimensions for Your Workbench
Before dwelling on the ideal dimensions of a workbench, it will be best to start with understanding the essential features a workbench should have. It should be heavy and stable enough to resist movement while you work on it. It should be sufficiently stiff so as not to wobble. Otherwise, your project will get ruined if the bench wobbles.
Furthermore, its base should be sturdy enough to prevent unnecessary movements. Besides, it should have the ideal height that is suited and comfortable for your use. It should also be suitable for the work types you often engage in. Having a storage of tools and parts likewise would be a plus factor.
You will find myriads of ways to build your workbench. Additionally, online, you’ll find many workbench designs and plans, with many looking sophisticated and expensive. Yet, when selecting or designing a workbench, it will be best to choose the one that best suits your working style and profile.
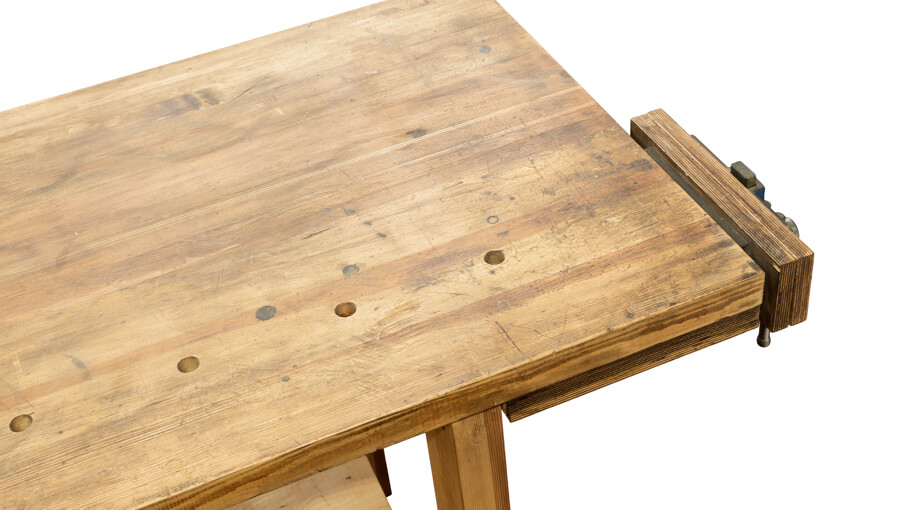
Workbenches usually are equipped with overwrought work-holding systems. Many got equipped with planing stops, bench dogs, board jacks, and holdfasts, with vises built into the frame.
Moreover, it will be best to build a versatile work surface to let you assemble different types of projects. This way, you can engage in whatever kinds of work on your workbench, including repairing damaged chairs.
3 Factors to Consider Regarding the Dimensions of Workbench
Regarding the ideal dimensions of workbenches, you have three factors to consider: height, length, and depth. Figuring out your prospective workbench’s height, length, and depth is a no-brainer, provided you get properly guided. Below are the ideal height, length, and depth range, that you can use as a guide in building your perfect workbench:
Workbench Height
Woodworkers vary in height and have varying comfort zones when it comes to the workbench’s height. Workbenches, however, can be categorized as low, average, and tall. You can avoid back and muscle pains if your workbench is perfect for your profile. The 36″ workbench, however, seems to be the ideal height for most woodworkers. This height allows for greater flexibility and versatility.
When using hand tools, you need height over your workpiece. So, it will be best to have a lower workbench. Nevertheless, if you often use power tools, adding several inches to your workbench’s height would be beneficial. However, if your works entail using hand and power tools more often, it will be best to settle for the 36″ mark.
To get the best height for your workbench, ensure that the top of your workbench aligns with your wrist when standing. If such is the case, your workbench will allow you to engage in varying woodworking activities without compromising convenience and comfort. Below is a short description of the low, average, and tall workbench:
Low: Low workbenches range in height from 29″ to 30.” Such workbenches are perfect for hand work, especially when you are engaged in hand planing, allowing you to get yourself over the bench while you work.
Average: If you want to walk the thin line between the low and the tall workbenches, you can go for the average workbench. The average workbenches range in height from 34″ to 39.” Besides, this range is the most popular and standard workbench height. This height range is perfect for you if you do a wide array of projects on your workbench.
Tall: The tall workbenches range in height from 38″ to 39″. If you want to engage in detailed work, you should go for a tall workbench. It is also perfect for cutting joinery or working with power tools.
Workbench Depth
Depth is relative, likewise, depending on your profile. But a good measure of the correct depth entails the distance you can quickly and comfortably reach. Any area you cannot get to within the workbench top will only collect dust and become useless. Many contend that the proper depth is about 600mm or roughly 2 feet.
Nevertheless, the proper depth also depends on which type of work you will often engage in your workbench. If you often work on large pieces of workpieces, then the logical thing is to go for a larger workbench. But if you will only occasionally work on large workpieces, your workbench should allow for extension. Sawhorses and plywood panels will do the trick for you.
Workbench Length
The length of the workbench depends on your comfort zone. You can lengthen the workbench as long as you can comfortably use it. Besides, you can prolong it as long as you got enough space in your workshop. 6 – 8 feet length of workbench can accommodate most medium to large woodworking projects.
The length of the workbench, however, hinges more on your preference. It doesn’t depend on your reaching abilities or profile. Nevertheless, if you stretch your workbench farther, you need to use thicker wood to ensure that it is strong and stable.
Optimal Thickness of the Workbench Top
The workbench top should be of solid wood. Its thickness, however, should be at least 3 inches to allow you to engage in your work comfortably. If you further increase its thickness, it might be counterproductive because additional thickness will only get in the way of your accessories. The thicker the workbench top, the higher the stability and holding capacity of the dog clamps.
The best wood for the workbench top should be durable and solid. Many woodworkers prefer the maple and oak, for these two are pretty stable and durable. Besides, they are dent-resistant, one of the characteristics a workbench top should have. However, most beginner woodworkers would opt for the plywood as the workbench top material. You can stack and glue up 2 to 3 sheets of 24mm high density plywood sheets to make the plywood workbench top solid and stronger for most woodworking tasks.
Additional Tips When Making a Workbench
The outcome of your woodworking undertaking usually matches the precision and effort you invest in building your workbench. So, if you meticulously build your workbench, you will surely enjoy its use. Aside from knowing the optimum dimensions and thickness of your workbench, it will also help if you are cognizant of the following additional tips when building your workbench:
Focus on Functionality
One sterling quality your workbench should possess is functionality. You don’t need to focus so much on aesthetics but focus more on whether it is functional. If you’re a beginner, you can mimic the designs of other workbenches that have been proven to be very functional.
Besides, you should ensure that the workbench you will build will provide you with all the essential functionalities that a workbench should have.
Furthermore, it will be best to ensure that the workbench can handle all the workpieces you will be working on, allowing you to work on their edges, faces, and ends comfortably. Thus, it helps to keep your design simple but functional. Furthermore, you have to make sure you will have enough dog holes on the workbench top as well.
It Should Have Storage
You can make your workbench truly functional and convenient by incorporating storage options into its design. It should have drawers, shelves, and tool holders for easy access to your tools and materials.
This way, you can maximize the use of your workspace while keeping your tools and materials well arranged and within range of access. Besides, good storage options allow you to keep your workshop organized.
Lighting and Power Considerations
Your workbench should incorporate the electrical power source and lighting systems in its design. You can install a 20-amp circuit in your workshop and wire your workbench. Of course, proper lighting is undoubtedly a critical aspect of your workshop. With adequate lighting, you can work safely and accurately on your projects. You can also reduce shadows that could make your work unsafe.
Your lighting, of course, depends on your preference. If you want an inexpensive lighting system, you can use fluorescent lighting. Besides, this system is easy to install and provides ample light. The fluorescent lighting system likewise doesn’t consume much energy.
You can also opt for tools with on-tool lighting. Moreover, you can also buy after-market lighting that is easy to install, with clamps or heavy-duty magnets.
These easy-to-install workbench lighting systems can complement your overhead lighting system. Additionally, you can purchase under-cabinet lighting if you have cabinets situated over your workbench.
Ensure that Your Workbench is Sturdy
It will be best to ensure that your workbench is solid and sturdy. The materials and the base of your workbench will dictate the strength and durability of your workbench. Of course, if you’re just a beginner, you can opt for a simple and cost-effective workbench made of 2x or 4x stock. Then, you can top it up with a plank stock or plywood. These materials can indeed provide sturdiness without breaking the bank.
It will also help to keep the joinery of your workbench simple. You can pre-drill lags and screws and use glue to strengthen the joineries further.
Likewise, ensure that your workbench can handle the workload you intend to bring on your workbench. So, it should have a sturdy and solid foundation. Besides, it will be best if you let the tabletop rest on its legs instead of relying heavily on fasteners.
How to Place Vises on Your Workbench?
The vises you usually use on your workbench are often flush with the workbench top. Besides, traditional workbench vises get connected to the workbench’s front left end. These face vises are on the left because when you work with hand tools, you usually work from left to right. So, this position is advantageous and beneficial to right-handers because they would be working on the left side of the workbench more often. Learn how to install the vise on workbench correctly.
On the other hand, the second vise is for gripping boards to allow you to deal with their faces. This vise is usually called the tail vise. It is generally positioned on the right side of the workbench because the right side is free. If you try to alter this setup of vises, you might be inviting trouble.
Another vise you will use on your workbench is the shoulder vise. This vise comes with a distinct advantage. It is easy to assemble and is not expensive. However, it can be a bump hazard. If you’re not wary of it, you might accidentally hurt yourself when you bump on it.
Other workbench vises include engineer’s vise, leg vise, quick release wood vise, wood screw vise, and many other vises.
My Personal Suggestions
Remember that the success of your woodworking projects depends, in a way, on how comfortable and functional your workbench is. Without a functional workbench, it will be challenging to kickstart your woodworking career. Thus, a workbench should be one of the first projects you should direct your effort and energy. When building a workbench, however, it will help to know the ideal dimensions for your workbench.
So, when building a workbench, it will be best to start with a great plan. Ensure you have great ideas about what an excellent workbench should be. Then, follow through with your superb plan and actualize it.


Liam is a 37-year-old woodworker and interior designer who loves to make every furniture project an art piece. He is very experienced in furniture design and woodworking project planning.