December 14, 2022
As you begin to dabble in woodworking, you will soon find yourself using your stock knowledge from your geometry class about angles. The reason for this is you will be making angled cuts to complete some of your woodworking projects. Moreover, the accuracy of your angular measurements will indeed have a bearing on the outcome of your projects.
You will seldom cut 25° and 35° angles, but you will be cutting more often 45° and 90° angles using hand saw. Of course, you will find it easy to make angled cuts using the miter saw. Yet, you can also get by cutting angles using the ordinary handsaw without spending your hard-earned money for a miter saw. You need only to be cognizant of the straightforward methods of making angled cuts and you are good to go with your woodworking projects.
WoodworkMag Video: 3 Fastest Methods to Cut a 45 Degree Angle with Hand Saw
Other Methods to Make Angled Cuts Using Your Handsaw
If you don’t have a miter saw for cutting angles, you can always do good with your angled cuts using a handsaw. Of course, unlike with the use of the miter saw, cutting angles using handsaw is more challenging. Hence, you need to know the following methods on how to come up with excellent angled cuts using a handsaw:
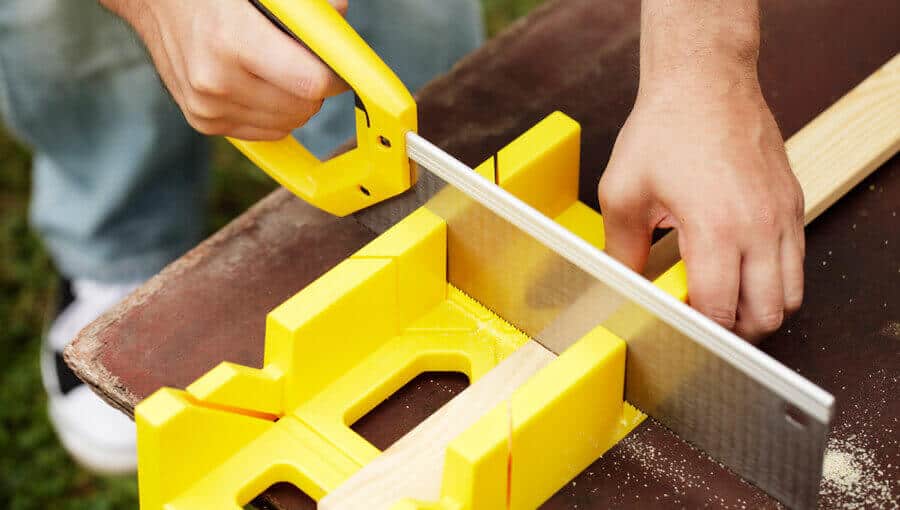
1) Using a Miter Box
Cutting angles, of course, is not an easy thing to do if you are a beginner in woodworking. Yet, with the use of a miter box, you can breeze through the cutting process with higher accuracy and precision. This box comes with slots on its sides that serve as your angular guides so that the saw will not slope from the vertical directions.
You can find in the market miter boxes made either of wood or plastic. Some miter boxes necessitate the use of vise while others come with a raised edge or hook on their undersides, which you can butt against the bench’s edge. With the miter box, you can make 45° and 90° cuts without worrying about the saw sloping to the wrong angle.
If you want more accurate angled cuts, you should use the miter box to keep the handsaw at the correct angle when cutting your wood piece. Thus, cutting angles become easy for beginners. Below are the simple tips when cutting angles with the miter box:
a) Cut Using a Tenon Saw
When you’re using a miter box, you can use a tenon saw to cut angles. The tenon saw is a bit shorter than the standard handsaw and is easier to use than the hand saw. It also comes with smaller teeth which lessens the risk of tear-out or chip at the wood fibers’ end while cutting.
Moreover, it has a rigid spine that prevents the blade from warping or curving too much while you cut. This characteristic of the tenon saw makes cutting angles easier and provides better results.
b) Cut on the Waste Side
The kerf of the saw will factor well in the accuracy of your cuts. It can produce gaps, especially if you are doing fine works or cutting joints. The kerf, of course, is the width of the saw. So, when cutting, you should always cut on your pencil line’s waste side instead of cutting exactly on the line center.
2) Cut without a Guide by Approximation or by Eyeing the Angle
This method of making angled cuts may be adequate for projects that do not require utmost accuracy. The results, however, of cutting by eye are variable unless you are an expert woodworker in using a hand saw. Of course, Of course, Beginners will find it hard to make straight cuts and usually end up with crooked cuts.
To do the cutting without a guide (miter box), you can use a sharpened pencil to make a thin line on your wood piece. Then, mark the required dimension. If you happen to purchase from a store, you will usually get wood with an excellent 90-degree cut. But you can still check its angle if its edge is a perfect right angle. If it is not perfectly angled, you can cut a small section at the timber’s tip. Afterward, you can go on making the required angled cut.
You can also use a carpenter square to check if the top side is perfectly angled. You can likewise utilize an engineer’s square or even a triangle. You can use these tools to get the right angle that you need to have. You need to position the pencil tip on the mark you have made at the onset. Then, slide the tool (square) and butt it against the tip. Afterward, mark along the engineer’s square.
Once you have marked the wood’s two vertical sides, you can hold the wood firmly and cut using a handsaw. You can likewise use a vise to hold the wood securely as you saw. Moreover, you should use the pencil lines on the timber’s surface as your guide in sawing. Ensure also that you keep the blade straight while you cut.
3) You Can Use An Angle Finder
If you want to cut different angles besides 45 and 90 degrees, you can use a digital angle finder. A digital angle finder comes in handy when measuring angles between the two sides of the wood. You can also use it like a bevel gauge to transfer angle onto the wood surface. You can do this by marking the rafter’s end before cutting.
The angle finder is easy to use and doesn’t require too much intelligence to use. You can use it as a square to mark the line of cut. You should mark the top of the timber using the angle finder, then draw lines down both sides using of a square. Afterward, you can join the dropped lines’ ends on the underside.
When you have found the angle and have properly marked it on the wood, you can remove the angle finder. Get your handsaw and prepare for cutting. You can position the wood depending on what is easy for you. Take the hand saw and slowly and precisely cut down along the marked line. You can clean the cut afterward to get the right angle.
Conclusion
Without the use of a miter saw, you can still manage to cut angles on your timber. However, if you have enough money, don’t hesitate to shell out something for a miter saw, for a miter saw will surely facilitate cutting angles on a plank of wood. Nevertheless, in the absence of a miter saw, you can employ the abovementioned tips on cutting angles using your handsaw. Cutting angles using a handsaw all boils down to how accurate your measurement is and how straight you cut along your markings.
Measuring and marking angles is not rocket science. All you need to have is a little refresher of what you have learned in geometry. Cutting along the marking requires consistency. But don’t be hard on yourself, for projects with angled cuts are not entirely square. Moreover, moldings, for example, warp and bend, and saws are not 100 percent straight and accurate.


Jason is a 40-year-old woodworker, carpenter and author who have been involved in the woodworking and woodcraft industry with 17 years of experience. He is expertise in technical aspects, woodcraft and furniture building projects.